Saturday, June 29, 2013

Sweet Creamed Corn

A couple of months ago, my mother-in-law asked me if I liked Creamed Corn and I realized I didn't know because I had never had it.  I have grown up a little and will try just about anything (not that creamed corn is adventurous)!  I figured that her and I could figure out a recipe because if I was going to try Creamed Corn, it was NOT going to come from a can!!!

Ingredients:
  • 3-4 Ears of Corn
  • 1/2 Cup Heavy Cream
  • 1 Tablespoon Flour
  • 1 Tablespoon Milk (I used 1%)
  • 1 1/2 Tablespoons Sugar
  • Salt and Pepper to taste
  • 2 Tablespoons of Butter
Serves about 5 people
 So I didn't dirty another pot, I just threw the corn, heavy cream, butter, sugar, salt, and pepper all back in the same pot that I just boiled the corn in over medium heat until butter is melted and mixture is hot.
 In a small bowl, whisk together the flour and milk until smooth.  Turn heat to high and stir for 1-2 minutes as mixture thickens.
This recipe could easily be doubled or even tripled for a larger batch to serve more people.

Be sure to check out our other DELICIOUS corn recipes!
Krazy Corn!


Herb Butter Corn on the Cob


Creamy Corny Rice

This recipe was featured on the Magical Moms' July Menu.  Be sure to check out all of our monthly menus


Lots of AMAZING recipes on the Magical Moms' June MenuMarvelous May MenuAppetizing April Menu, and March Madness Menu.

Friday, June 28, 2013

Grilled Pound Cake with Fresh Blueberries and Whipped Cream

Blueberry season is in full swing so we are eating them all the time! The boys and I picked several pounds.  We pick at a local place call Eagletree Farm it is pretty close to us, it only takes about 20 minutes to get there and it is well worth the drive!!!  I have been making and baking all kinds of yummy treats like Blueberry Muffin Tops, Frozen Blueberry Cheesecake Bites, Blueberry Lemonade, and Frozen Yogurt Covered Berries.  Blueberries freeze great so you can have them year round.  I have lots more yummy stuff on my list to make so I will probably have to pick some more before the season comes to an end.  

Ingredients:
  • 1 Loaf of Pound Cake (sliced into about 3/4 inch slices)
  • About 1 1/2 Cups of Fresh Blueberries
  • 1 Cup of Heavy Whipping Cream
  • 2 1/2 Tablespoons of Powdered Sugar
  • Sugar Crystals (optional)
  • Lemon Extract (optional)
Depending on size of pound cake loaf, serves about 6

In a mixing bowl with tall sides, combine powdered sugar and heavy cream.  If you would like to flavor with an extract now would be the time.  I had planned to add a drop of lemon extract, but I realized I was out but I will try it next time.  With an electric hand mixer beat them together.  After about two minutes cream will start to thicken, continue for about 30 seconds more until it is thick and fluffy.  The very first time I made whipped cream this way, I thought I had just witnessed a magic trick.  It is pretty darn cool.  Put in fridge until ready to use.
Next, heat cast iron grill pan, place pound cake in skillet and "grill" until slightly browned.  My pound cake was pretty buttery so I didn't place any additional butter on the bread or in the skillet and it browned nicely.  But you may want to lightly butter both sides before grilling to get the nice carmelized texture.  
While you are "grilling" the pound cake, mash about a cup of blueberries with a fork making a blueberry smash sauce.  Top grilled cake slices with blueberry sauce, whipped cream, and additional fresh blueberries. Sprinkle a little crystal sugar and ENJOY!
If you are looking for some other recipes using blueberries check out the recipes below
Blueberry Muffin Tops


Frozen Blueberry Cheesecake Bites


Blueberry Muffin Mousse


Thursday, June 27, 2013

Triple Threat Brownies

I LOVE having company over because it gives me a reason to make a dessert!  And I really LOVE having company over to EAT the dessert otherwise I will keep eating it until it is GONE!  We had some family stay with us for a long weekend, so I got to make a few desserts while they were here.  YAY!  This recipe combines several of my favorite things 1- Brownies, 2-Cheesecake, 3-and Peanut Butter.  YUM YUM and YUM!

Ingredients
  • 3 Cups Rice Crispies
  • 1 Cup Peanut Butter
  • 12 oz bag of  Semi Sweet Chocolate Chips
  • 12 oz can of Cream Cheese Icing
  • Brownie Mix (made according directions on box)
Make brownies according to box in a 13x9 inch baking dish.  Let them cool completely.  When cool, spread the cream cheese icing evenly over brownies. Place in freezer for about 20 minutes or long enough for the icing to become hard.  This will make it easier to spread the third layer on top.  
 In a sauce pan combine chocolate chips and peanut butter.  Over medium heat stir the peanut butter and chocolate chips as they melt.
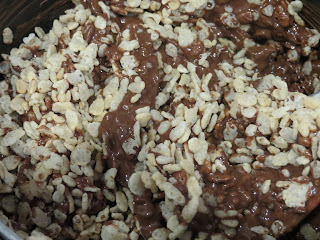
 When the mixture is smooth and creamy and all chocolate chips are melted, remove from heat. Add in the rice crispies and gently stir to combine.
 Make sure you stir gently so you don't crush the rice crispies.
 At this point, my kids asked me if this is how you make Cocoa Crispies...they always make me laugh!
 Remove brownie pan from freezer and spread the rice crispy mixture evenly on top.  Refrigerate the triple layer brownies for about a half hour.  Cut with sharp knife and serve with a glass of milk!!!

Store covered in the refrigerator

Thursday, June 20, 2013

Tracy's Version of the 2-Ingredient Cookie

I know I know... You can tell by the picture that I used more than two ingredients.  Sorry!  I had two REALLY ripe bananas sitting on my counter, I was just about to throw them away but I remembered a recipe that I had seen on Pinterest for 2-ingredient cookies made with bananas.  So I did a quick search and found this recipe from The Burlap Bag.  Her recipe says that you take two ingredients- bananas and oats and add a mix-in.  Since Nathan was helping, he of course had to put in chocolate chips.  I wanted to put raisins, but he said no.  Luckily he agreed to the Craisins.  After reading some of the comments and reviews I was a little concerned about sweetness to I added a little brown sugar.  After tasting the cookies, they would have been fine without it.  I had never made a cookie without flour or sugar so this was an interesting challenge for the day.  This is a great way to not waste bananas and create a treat for the family in just a few minutes.


Ingredients:
  • 1 1/4 Cups of Quick Oats
  • 2 Large Ripe Bananas
  • 1 Tablespoon of Brown Sugar
  • 1/4 Cup of Mini Semi-Sweet Chocolate Chips
  • 1/3 Cup of Craisins
Makes about 14 cookies

Preheat oven to 350.  
I was a little concerned that the texture of the oatmeal would turn my picky 3-year old away from the cookies, so I put the Quick Oats in the food processor and milled them into smaller pieces.  I definitely didn't completely grind them down- Just a few seconds in the food processor.  
 Next, peel the bananas drop them in a large bowl.  The riper they are, the easier they are to mash.  This recipe was pretty much all Nathan's hard work.  He got to show off his muscles while he mashed the bananas! He had never used a potato masher before-such FUN!

 Then using a spoon, stir in oats, brown sugar and mix ins. The original recipe called for just one cup of oats, but I felt my dough was WAY too runny so I suggest adding another 1/4 cup of oats.  Obviously not all bananas are the same size so adjust accordingly.
 When all the ingredients are well mixed, scoop them onto a cookie sheet lined with parchment paper.

Bake for 14-16 minutes.  The cookies will be soft and oh so good!  FYI.  I am pretty sure that no matter how long you cook them they don't become a crispy cookie.  I think that the banana keeps them moist. They are definitely not the prettiest cookie I have seen, but prettier than those no bake peanut butter things:)

I had to laugh at myself for turning a 2-3 ingredient cookie into a 5 ingredient cookie.  Who knows what I will add in next time?  
  • Butterscotch Chips
  • Nuts
  • Raisins
  • White Chocolate Chips
  • Coconut Flakes
  • Dried Blueberries
  • Mini M&M's

Tuesday, June 18, 2013

Orange Chicken and Fried Rice

My husband has been emailing me Orange Chicken recipes for months now.   I looked over all of the recipes that he sent me and came up with one of my own.  Since he had been requesting it for so long, I decided that Father's Day would be the perfect day to make it.  I don't normally like to create new recipes for special occasion meals, so I was a bit nervous the whole time I was making it.  The orange chicken that my husband normally gets for take-out is fried.  I wanted to create a much healthier version that still had the take-out feel.  This recipe got his stamp of approval!

Ingredients:
  • About a Pound of Chicken Cut into Bite Sized Pieces
  • 1 Tablespoon Honey
  • About 1 1/2 Tablespoons Sesame Oil
  • Orange- 1 Tablespoon Zest and 4-5 pieces of peel
  • a couple dashes of ginger
  • a pinch of Crushed Red Pepper Flakes
  • 2 teaspoons corn starch
  • 1/2 Cup Orange Juice
  • 1/2 teaspoon minced garlic
  • 1Tablespoons of Soy Sauce
  • Salt and Pepper
Salt and pepper the chicken.  Heat sesame oil in skillet.  Add in orange peels and stir for about a minute.  Next, add in the chicken stirring and flipping to make sure it is cooked throughout.  
While chicken is cooking, mix together ingredients for sauce.  Place minced garlic, soy sauce, orange juice, ginger, orange zest, crushed red pepper flakes, and honey in a small food processor and mix well.  Pour mixture into small bowl and whisk in cornstarch.  Remove orange peels from chicken skillet and discard.  Pour sauce mixture into chicken skillet and simmer for about 5 minutes sauce will thicken.  

Fried Rice
  • 1 Egg
  • 2 Cups of Rice
  • About 1 1/2 Cups Broccoli- cut into bite size pieces
  • 1 small to medium Carrot- diced
  • 1/4 Cup diced Onion
  • 1 1/2- 2 Tablespoons of Soy Sauce
  • 2 Cups of Water
  • 1 Chicken Bouillon Cube
  • 1/2 Cup of Frozen Peas
  • Drizzle of Olive Oil
Drizzle olive oil into bottom of medium sauce pan and heat.  Add onions and lightly saute for about a minute. Pour in rice and stir to coat.  Add in water and bouillon cube, cover and simmer about 12 minutes or until all of liquid is absorbed.  In a large skillet drizzle a small amount of olive oil and heat.  Add carrots and saute for about two minutes.  Add broccoli, peas, and a couple tablespoons of water and cover.  This will steam the broccoli.  It will only take a few minutes so don't let your broccoli turn to mush.  Push the veggies to one side of the skillet.  On the other side crack an egg and scramble it.  

Once it is cooked all the way, combine the veggies and scrambled egg.  Make sure the egg is in really small pieces.  When the rice is done cooking, dump it into this large skillet and mix with the veggies.  Add soy sauce, turn heat to high and "fry" the rice, stirring throughout.  This will only take about 2 minutes.  

Place a layer of rice on plate and top with the Orange Chicken and Sauce.  Enjoy!

This recipe was featured on the Marvelous May Menu be sure to check out all of the other recipes and menus for recipes, ideas, and inspiration.  

Tracy's personal favorite take-out recipe is our Teriyaki Beef and Broccoli.  


Saturday, June 15, 2013

Pocket Burgers

I often watch The Chew on ABC.  I always see things I want to try but most of the time I forget about them before I make my next menu.  This one stuck in my head.  It was an episode that had Mario Batali's kids cooking up some of their favorites.  The boys actually have their own cookbook called The Batali Brothers Cookbook.  This is not their exact recipe, but the same concept.  I used my family's favorite spices and stuffers to adjust to our taste.  I am sure that the original recipe is great too!  My father-in-law REALLY enjoyed these, he has already requested them again for the next cook out.  The burger was awesome alone, but the Onion Straws on top


Sorry for the lack of pictures, this was a two hands in raw meat kinda job.

Ingredients:
  • 1 1/2 Pounds of Ground Beef
  • 1/2 teaspoon Garlic Powder
  •  A pinch of Crushed Red Pepper ( I crumble it between my fingers)
  • 1/2 teaspoon Salt
  • 1/4 teaspoon Black Pepper
  • Your favorite toppings- lettuce, tomato, pickles, onion, ketchup, mayonaise, mustard, BBQ Sauce. 
Stuffer Options
  • Cooked Crumbled Bacon & Shredded Cheddar (my mother-in-laws favorite, she adds a little BBQ sauce on top)
  • Sauted Onion & Blue Cheese Crumbles
  • Sauted Mushrooms and Swiss Cheese
  • Really you can add whatever you have on hand.  I am sure that my Bother-in-law will come up with some crazy combinations!
Divide the hamburger in to 5 equal parts.  Take one part at a time and divide that in half.

Flatten each of those parts put the stuffers in the center of one of the part and place the other on top.  Gently seal together the top and bottom with your fingers.  Repeat with all 5 of the burgers.  In a small bowl combine the garlic powder, salt, pepper, and crushed red pepper.  Sprinkle on both sides of all of the burgers.  Grill each side until they have reached desired temp.  
I also made Onion Straws with a horseradish dipping sauce.  Some of these went on the plate, Some went on my burger.  YUM!


This recipe was featured on our 30 Days of Dinners June Menu, Make sure to check out all of the other great recipes on this month's menu!

Mickey Mouse Birdhouse

My boys are not always up for crafting with mommy.  I am not sure if that is because they are just boys or if it is because they don't share the love of crafting with me.  Either way I was pleasantly surprised by their attitudes when I got out the supplies to make these bird houses.  I think the combination of the Mickey theme (they LOVE Disney almost as much as me!) and the fact that they were able to get there hands a little messy (paint/dirt- It's all the same to them).  
Supplies
  • Wooden Birdhouse
  • Wood Circles
  • White Buttons
  • Red, Black, and Yellow Acrylic Paint
  • Paint Brushes
  • Newspaper (to line the counter)
  • Paper plate (for paint pallet)
  • Painters Tape
  • Hot Glue Gun
  • Scissors
  • Clear Coat Sealer (if you want to put it outside)
I purchased most of the supplies at my local craft store A.C.Moore.  I bought two bird houses, 6-pack of wood circles, 4 buttons, and 3 bottles of acrylic paint for  less than $5.  I had the rest on hand already.  

I started by taping off the bird house so that everything but the red could be painted. Taping it off made it very easy for my kids to paint this by themselves.  

Nathan hard at work

Evan painting the roof
While the kids were painting the house, I cut a small part off of the wood circle to make a flat part to sit flush with the birdhouse roof.  Then I had the kids paint them black as well.  This project was a two day project because of drying time and other activities in between.
Then we let that dry and removed the tape.  Before you remove the tape you could add a second coat if needed.  When my husband saw them at this stage he was very concerned that we were making Pittsburgh Steeler birdhouses.  We are from Ohio, of course we were not making anything from Pittsburgh!
Then I taped off the black and yellow and let the kids paint the red.  So far so GOOD!
Once the red was dry (with optional second coat) use the hot glue gun to adhere the wood ears and buttons.  
Overall this was a very easy project and the kids can't wait to paint again!!!

Crispy Onion Straws with horseradish dipping sauce

Onion straws are something that I have wanted to make for a very long time but I was always afraid.  I am not even sure what exactly I was afraid of, but now that I have done it I am HOOKED!  This is something that I love to get at restaurants, but now I can make them at home!

Ingredients:
  • Large onion
  • 1 Cup Butter Milk
  • 1 Cup of Flour
  • 2 Cayenne Pepper
  • About 3 Cups of Canola or Vegetable Oil
Sauce
  • 1 1/2 tablespoons ketchup
  • 1/4 cup mayo
  • A few dashes of paprika
  • pinch of oregano
  • A few dashes of cayenne pepper
  • A few dashes of garlic powder
  • About a teaspoon of horseradish
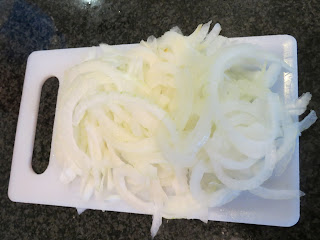
Slice the onion into thin pieces.  I did this by hand because I don't have (but I want one) a mandolin but that would work best.  The thin pieces are what make is more of a "straw".  

Place onions in a flat dish and pour the buttermilk over top of them.  Place in refrigerator for about an hour.
To make the dipping sauce, simply combine ingredients and stir.  Adjust spices as necessary.
On a plate, combine the flour and cayenne pepper

Heat oil in fryer or as I did in a large pot.  I used about 3 cups of oil, but you really just want to make sure you have about 2 inches of oil.  Heat the oil to about 350 degrees.  I don't have a thermometer so I just tossed in a very small pinch of the flour mix and once it sizzled as it touched the oil I knew it was hot enough.
With a pair of tongs, remove the onions from the buttermilk and place one bunch at a time into the flour mix and completely coat.
Tap off extra flour and drop into hot oil and drop onions in the oil and cook for about 2 minutes or until they are a nice golden brown.
Remove from oil with tongs or mesh strainer and place on paper towel to drain off excess oil.  Repeat until all onions are cooked.  Serve immediately with the spicy dipping sauce.

I served these with Pocket Burgers and Deviled Eggs

This recipe was featured on our 30 Days of Dinners June Menu, Make sure to check out all of the other great recipes on this month's menu!

Sweet Pepper Pilaf

I am so glad that Sherrie introduced me to her super easy Better Than Rice-A-Roni Rice Pilaf recipe.  My family (including myself) loves the original recipe, but I love to see how I can change it up.  The first few times I made Sherrie's recipe I had to look at the blog, but now I make it from memory because it is so easy.    Trust me you will never make rice from a packet again!  Cooking the rice in the chicken broth gives it so much flavor.
  Ingredients:
  • 1 Cup Orzo
  • 1 Cup of Minute Rice
  • 1/2 Cup Sweet Red Pepper (diced)
  • 1/4 Cup Onion (finely chopped)
  • Salt and Pepper to taste
  • 2 Cups Chicken Broth
  • Olive Oil
Drizzle Olive Oil in the bottom of saucepan and heat.  Add in onion and saute for about a minute.  Next, stir in Orzo.  Stir occasionally while toasting the orzo for about 2 minutes then stir in peppers.
Add in the rice and continue heating another two minutes.  Then pour in chicken broth.

Cover, bring to a boil, and then reduce heat to low.  Keep covered and cook until liquid is absorbed-about 15 minutes.  Fluff rice with a fork and salt and pepper to taste.  

I served this with Bang Bang Chicken, but it is a very versatile side dish and can go with almost anything.  
Some of my other variations include Parmesan Pilaf and Cumin Rice.

This recipe was featured on the Magical Moms' July Menu.  Be sure to check out all of our monthly menus


Lots of AMAZING recipes on the Magical Moms' June MenuMarvelous May MenuAppetizing April Menu, and March Madness Menu.